Understanding Garage Door Torsion Spring Parts

Do you know what kind of part this is?

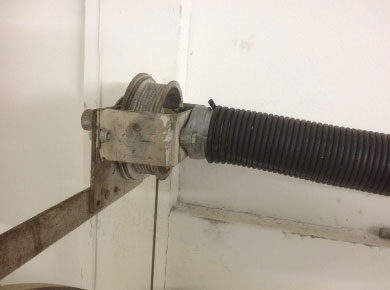
So my guess with this picture is that this is the same garage door as the previous picture; if not, this store is also very old. This torsion spring mounting setup is pretty much identical to the Easy Set torsion springs manufactured by Clopay. The only difference in the two is that this older setup does not have a mechanism built in where you can just turn a screw with a hand drill to wind up the torsion spring; this setup requires you to find the torsion spring with winding bars the conventional way.

Modern vs. Traditional Torsion Spring Mounting

The more modern way to mount torsion springs is to use a spring mounting bracket that you can screw into the header beam and bring both springs to the middle of the garage door to mount them both to the center mounting bracket. Also, if you will notice in the picture shown, there are no flag brackets existing; this door was manufactured before they started using flag brackets and center mounting brackets.

Specific Cases for Torsion Spring Installation

Now there are certain cases when installing a garage door where you might need to mount your springs on the far left and far right-hand side of the torsion pole, but you will need some different pieces of hardware to make this happen. Manufacturers make bottom brackets where you can run the cables on the outside of the door track, meaning that the cable drums will also have to be on the outside of the door track, allowing you to mount the spring directly to the bearing bracket.

Reasons for Outside Cable Setup

I have sometimes had to utilize this hardware setup called ‘cables slung outside.’ There are about two reasons that I can think of for mounting my torsion springs in this manner. One is for low headroom applications, where you do not have enough room above the torsion pole to mount a garage door opener, as the torsion springs and the bracket that they mount to usually would be in the area where you would want to mount the garage door opener rail.

Challenges in Garage Door Installation

The other reason I would use this hardware setup is if there is no wood to screw into in the part of the garage above the garage door, where you need to screw the center mounting bracket to the header. In some constructions, there will be two headers because there are living quarters above the garage, and sometimes between these two headers, there is no wood to screw into. These headers can sometimes be separated by 6 to 12 inches of dead space where there is no wood behind the drywall to screw any hardware into.

Seismic Considerations for Garage Doors

Also, on the West Coast, where you experience a lot of seismic activity and earthquakes, zoning laws are now requiring home builders to frame the garage door completely with steel I-beams. These are the same kind of I-beams that you would find in the construction of tall office buildings or skyscrapers. This will also leave dead space behind the drywall where you would need to screw in garage door track and hardware, and there is nothing behind the wall except a steel I-beam.

Advantages of Bear Bracket Installation

So mounting my torsion springs directly to the bearing brackets on the left and right-hand side would eliminate the need to mount them to a header in the middle of the garage door, especially where there is no wood to screw into. The other reason for mounting springs directly to the bearing brackets is what they call “torsion to the rear.” This setup places the entire torsion spring assembly to the rear of the garage door, directly behind the horizontal track, for extremely low headroom garage doors.

Special Considerations for Low Headroom Garages

Some garages may have water pipes or sewer pipes running along the header above the garage door, necessitating the placement of the entire torsion spring assembly. In this case, you would bring everything to the rear of the horizontal garage door track. However, you will have to use a low headroom hardware package and extra-long cables because your cables will need to be twice as long to reach from the bottom of the garage door up and around a pulley, all the way back about 8 feet to the rear of the horizontal track.

Common Issues with Rear Torsion Spring Setups

Using a rear torsion spring setup is not always recommended for some doors, and many garage door companies will not even install them. This hesitation may stem from a lack of experience with this kind of setup or concerns that it will cause problems with the garage door later on. Companies may be wary of making free service calls in the future, which is why many opt to avoid this specific hardware arrangement altogether.

Frequently Asked Questions

Genie garage door openers are highly reliable, but there are always questions about how to maintain and optimize their functionality. Here are five more FAQs to help you.


1. How do I adjust the force settings on my Genie garage door opener?

Adjusting the force settings can help your garage door opener function smoothly. Here’s how:

  1. Locate the adjustment dials: These are typically on the back or side of the motor unit.
  2. Identify the “Up Force” and “Down Force” dials: Adjust these settings according to the door’s performance.
  3. Test the door: Make small adjustments and test the door’s movement after each change.

Ensure the door opens and closes fully without stopping or reversing unnecessarily.


2. Can I use LED light bulbs with my Genie garage door opener?

Yes, but ensure you choose the right type:

  • Look for LED bulbs designed for garage door openers: These are engineered to minimize interference with the remote control signal.
  • Check wattage compatibility: Use bulbs within the recommended wattage range for your Genie model.
  • Install properly: Secure the bulbs tightly to avoid vibrations causing malfunctions.

Using the right LED bulbs improves energy efficiency and longevity.


3. How do I clean and maintain the safety sensors?

Keeping the safety sensors clean ensures reliable operation. Follow these steps:

  1. Turn off the opener: Disconnect the power to avoid accidental activation.
  2. Inspect the sensors: Check for dirt, cobwebs, or obstructions.
  3. Clean the lenses: Use a soft, dry cloth to wipe the sensor lenses gently.
  4. Align the sensors: Ensure the sensor beams are aligned, indicated by a solid light on both sensors.

Regular cleaning prevents false triggers and ensures safety.


4. What are the benefits of upgrading to a Genie Wi-Fi-enabled opener?

Upgrading to a Wi-Fi-enabled Genie opener offers several advantages:

  • Remote control access: Operate your garage door from anywhere using a smartphone app.
  • Notifications: Receive alerts when the door opens or closes.
  • Enhanced security: Monitor usage and set schedules for opening or closing the door.
  • Integration with smart home systems: Connect to platforms like Alexa or Google Assistant.

This upgrade adds convenience and peace of mind to your daily life.


5. Why is my Genie opener making unusual noises?

Unusual noises from your garage door opener might indicate:

  • Worn-out parts: Check the motor, belts, or chains for wear.
  • Lack of lubrication: Apply lubricant to the moving parts, including the rollers and tracks.
  • Loose components: Tighten any bolts, nuts, or screws that may have come loose.
  • Track misalignment: Ensure the tracks are aligned and free from obstructions.

If the noise persists, consult a professional to prevent further damage.


Final Thoughts

By addressing these common concerns, you can ensure your Genie garage door opener functions reliably and efficiently. Whether it’s routine maintenance, smart upgrades, or troubleshooting noises, taking proactive steps will extend the life of your opener and keep your garage secure.

To help you get the most out of your Genie garage door opener, here are answers to more commonly asked questions that tackle both troubleshooting and advanced functionality.


1. How do I reset my Genie garage door opener after a power outage?

After a power outage, your Genie opener might need resetting to function correctly. Follow these steps:

  • Disconnect the opener: Pull the emergency release cord to disengage the motor.
  • Manually close the door: Ensure the door is fully closed before proceeding.
  • Reconnect the opener: Plug the opener back into the power source.
  • Reprogram if needed: Refer to the user manual to reprogram your opener, especially if the remote control isn’t working.

If the problem persists, inspect the circuit breaker or contact a professional.


2. What does the blinking light on my Genie garage door opener mean?

A blinking light on your Genie opener often indicates an issue. Here are common reasons:

  • Sensor misalignment: Check if the safety sensors are aligned and free of dirt or debris.
  • Error codes: Refer to the user manual for specific error code meanings.
  • Obstruction detection: Ensure nothing is blocking the door’s path.

Addressing these issues promptly can restore your opener to normal operation.


3. Can I connect my Genie garage door opener to a smart home system?

Yes, many Genie garage door openers are compatible with smart home systems. To integrate:

  • Check compatibility: Look for Genie models that support Wi-Fi or work with systems like Aladdin Connect.
  • Install the smart module: Follow the instructions provided with your Genie model.
  • Download the app: Use the corresponding Genie app or a third-party smart home app to control your opener remotely.

This setup enhances convenience and adds security features, such as notifications.


4. How often should I replace the batteries in my Genie remote?

Replace the batteries in your Genie remote every 1-2 years, or sooner if:

  • The range decreases: The remote works only when close to the garage.
  • The remote stops functioning intermittently: Ensure fresh batteries are installed.
  • The LED indicator dims: This is often a sign of low power.

Use high-quality batteries to ensure long-lasting performance.


5. Why does my Genie garage door opener stop midway when closing?

If your opener stops midway, consider these potential causes:

  • Door balance issues: Test if the door moves freely by hand after pulling the emergency release cord.
  • Obstructions: Check for objects in the door’s path or dirt on the tracks.
  • Overhead spring wear: Broken or weak springs can strain the motor.
  • Force settings: Adjust the opener’s force settings as per the user manual.

Consult a professional if these steps don’t resolve the issue.


Final Thoughts

Genie garage door openers are designed for convenience and durability. By staying informed and addressing issues promptly, you can maximize their performance and extend their lifespan. Regular maintenance and smart upgrades can make a big difference in functionality and ease of use.

Garage door openers are essential for home convenience, and the Genie brand is a popular choice for reliability. Below, we answer some of the most common and unique questions to help you troubleshoot and maintain your Genie garage door opener.


1. What to do when Genie is not working?

If your Genie garage door opener stops working, start with these troubleshooting steps:

  • Check the power supply: Ensure the unit is plugged in and that the outlet is functional.
  • Inspect the remote batteries: Weak or dead batteries can prevent the remote from operating the door.
  • Look for obstructions: Make sure nothing is blocking the door or the safety sensors.
  • Test the manual operation: Pull the emergency release cord to verify that the door moves smoothly by hand.

If these steps don’t solve the issue, consult your user manual or contact a professional for assistance.


2. How do I reprogram my garage door opener?

Reprogramming your Genie garage door opener is a straightforward process:

  1. Locate the “Learn” button on the motor unit.
  2. Press and hold the button until the indicator light starts flashing.
  3. Press the button on your remote that you want to program.
  4. Wait for the motor unit’s light to flash or click to confirm the pairing.

Your remote should now be successfully programmed to your opener.


3. What wears out a garage door opener?

Over time, several factors can wear out a garage door opener, including:

  • Frequent use: Heavy daily operation puts strain on the motor and mechanical parts.
  • Lack of maintenance: Skipping lubrication or ignoring worn components accelerates wear and tear.
  • Environmental conditions: Extreme temperatures or humidity can impact the opener’s lifespan.
  • Old age: Most garage door openers last about 10–15 years with proper care.

Regular maintenance can significantly extend the life of your opener.


4. Why does my garage door just click and not open?

If your garage door opener clicks but doesn’t open the door, here’s what to check:

  • Inspect the safety sensors: Misaligned or dirty sensors can prevent operation.
  • Examine the motor: Clicking might indicate a motor that’s attempting to work but is under strain.
  • Check the springs: Broken or worn torsion springs can make it impossible for the opener to lift the door.

Addressing these issues may require professional repair to ensure safe operation.


5. Why is my garage door opener not responding?

When your Genie garage door opener isn’t responding, consider these possibilities:

  • Remote control issues: Replace the batteries or reprogram the remote.
  • Signal interference: Ensure no electronic devices are disrupting the signal.
  • Disconnected power source: Verify the opener is properly plugged in and the circuit breaker hasn’t tripped.
  • Worn-out parts: Aging components such as the motor or gears may need replacement.

If you’ve tried these solutions and the problem persists, professional assistance is recommended.


Final Tips

To keep your Genie garage door opener functioning efficiently:

  • Perform routine maintenance, such as lubrication and cleaning.
  • Address any unusual noises or behaviors immediately.
  • Schedule an annual inspection with a professional to ensure all components are in good condition.

By staying proactive, you can avoid common issues and ensure reliable operation for years to come.

Ask a question?

If you have a questioin regarding a part , fill your details and  we will get back to you shortly.

Ask a question?

If you have a questioin regarding a part , fill your details and  we will get back to you shortly.