
Diagnostic – when you activate the openers and you can hear the motor running but the opener carriage is not moving or the opener is making loud grinding noise is when operating the door. Or the opener will not stop when operating the door this is because the gear and sprocket assembly also drives the limit switches which stops the door in the up position and in the down position.


Part cost: $ 30 ¬ 50 for the part you might be able to find a local garage door company to sell you the replacement kit but sometimes they do not like to sell to the general public so your best bet would either be the internet. I have seen them on eBay or amazon may be another outlet but you have to be sure about what you are getting. You will most likely not be able to find this part at a lowes or home depot. Another outlet to find the part you need may be at sears. This is because liftmaster manufactures the craftsman line of garage door openers and the parts are pretty much identical but the model numbers are not so this is where you have to be careful. A quick phone call to liftmaster tech support may help you easily find the part you need.
Difficulty moderate time to repair: 2 4 hrs.


Tools needed: I mpact drill (not necessary but recommended), 1⁄2 socket or wrench, 5/16 socket and 5/16 wrench(5/16 ratchet wrench highly recommended), 1⁄4 socket, flat head and phillips head bit or screwdriver, 3 inch socket extension.
Before I get started with instructions on how to replace this part I must tell you this is the most common repair on liftmaster openers that there is. I spent a couple of years not only repairing garage doors but 80% of my work was repairing garage door openers and believe me when I tell you I could not keep enough gear and sprocket kids on my truck to handle the volume of repair that they needed. Not to mention that I have had to perform this repair in the complete darkness of the garage using only the light that my impact drill gives off when I pull the trigger. The instruction I am about to give you is the same as a chain drive and or a belt drive opener. The most common mistake that installers make when installing these types of openers whether it be a chain drive or a belt drive is tightening the chain or belt too tight this puts a lot of pressure on the gear and sprocket kit internally in the opener motorhead. There are two different ways that this part can malfunction or wear out prematurely. The first is the plastic gear that turns the sprocket of a belt or chain drive opener. Keeping in mind that the part we are replacing not only drives the chain or belt to open the door but it also drives the limit switch assembly. The limit switch assembly is what tells the opener to stop the door in the proper
Position on the way down and also on the way up. Wear and tear on the internal parts of a liftmaster opener come from either a door that is too heavy and not properly balanced with the springs or the chain or belt which drives the opener has been tightened down to taut or tight.
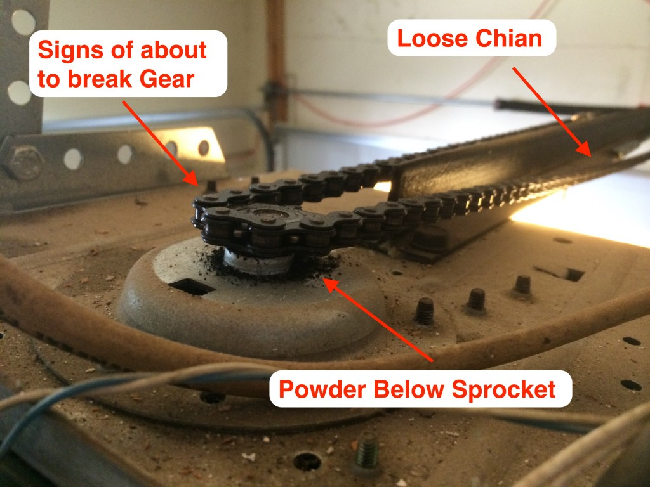
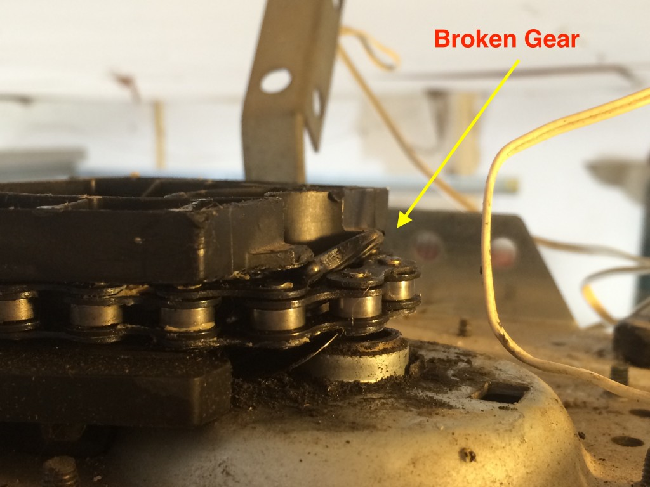
If this is the problem with the original install then it is common to diagnose because usually the sprocket has sheared itself away from the metal post that drives it and the chain is most likely hanging on the opener. If a garage door is too heavy or maybe has a broken spring in the home owner does not know and is open is still lifts the door. Wheres on the plastic gear internally and strips it out to where there is no more teeth on the gear to make the opener function properly. To diagnose the difference between the two you must take the screws out of the opener head so you can open up the motorhead and inspect what is going on internally if the gear is being stripped out by heavy door you will see that the big white plastic gear has no teeth left and cannot properly lift the door if the diagnosis is a chain or belt that is too tight when you open up the motorhead you will see a black dust on top of the big white plastic gear this means that the deterioration is coming from the metal shaft that it the gear attaches to in other words if a chain or belt is too tight and pools on that shaft then it leaves a metal residue on the very top of that white plastic gear and his gray in color if you see this kind of dust and you know that thats where the problem is coming from. In either case the gear and sprocket kit needs to be replaced. First you have to make sure you have the correct part if you have an opener that is three¬quarter horsepower the gear and sprocket most likely will be different than a 1⁄2 or 1/3 hp opener. The one third or half horsepower chain or belt drives are usually the same as far as the bolt patterns in the way they fit. . If you pull down your light cover on the right or left side or even the front or rear side you should come across the model number on a small sticker to give to the liftmaster technician in order to give you the right part to replace the gear and sprocket. There are two white gears in the gear and sprocket kit assembly one is a drive gear which is white plastic and perfectly round and the other is attached to the motor post itself and it is long and made of white plastic also but is shaped like a screw this is the worm gear I do not usually replace the secure when I am performing this operation because they almost never wear out I have never had to replace one they are made a vow of a different compound and do not easily wear out like the round drive gear that turns the sprocket which seems to always wear out. You should be just fine leaving the worm gear alone. When you have determined that you have the right part for your application the next steps are as follows.
Step one – unplug the motorhead from the electrical socket to ensure that you do not shock yourself because in the process of replacing this part you can hit a power wire and shock yourself or wipe out the control board inside the opener. I have replace these parts and unknowingly had a power wire in the way when tightening the screws and shorting out the whole opener.
Step two – you will have to remove the chain or belt from around the sprocket that drives the opener. Locate the trolley or carriage this is the part that moves back¬and¬forth on the rail that the door is attached to buy the hockey arm. If you are looking out of your garage from inside then you will need to be on the left hand side of the opener rail to access the chain or belt adjustment. There you will see a long screw with two half¬inch nuts securing the chain to the trolley what you want to do is loosen the nut on the left hand side with a half inch wrench. You do not need to remove the chain you will want to loosen it enough to get the chain off of the sprocket. Try to leave that left nut on the boat it makes it easier for putting the chain back on. If the sprocket has broken off in the chain is no longer attached you will still need to loosen the left side not to get the chain back on to the new sprocket when you are done. Once the chain is removed from the sprocket continue on to step three.
Step three – you will need to remove the steel cover on the opener motor head to access the gear and sprocket. Some liftmaster openers have been constructed vertically or horizontally.
If your light covers are front and back then your opener has been constructed vertically. If your lights are on the left and right inside of the opener motorhead then your opener has been constructed horizontally. In either case the process is pretty much the same. The screws that hold the opener cover in place are either phillips head or 1/4 inch drive socket. You may need to remove the light covers to access the screws. You will need to remove the two screws on either side of the opener and they will be at the top of the opener cover. Then you will need to remove the four screws which are located at the bottom left and right hand side of the motorhead this will drop the opener covered down so you can access all the inter¬workings of the opener motorhead. The screws at the top left and right hand do not need to be removed it just makes it more difficult to put back together. The gear and sprocket assembly is screwed into the top of the opener by three screws they are 5/16 in size you will need a 5/16 driver to remove the screws it works best with some sort of extension. And then you will need a small 5/16 wrench to remove the third screw it is not accessible with a drill or impact driver. There will be one 5/16 screw that you cannot access with your drill you must use a 5/16 wrench to remove the screw and ratchet wrenches work the best for this type of application. What you have removed the three screws now you will have to follow the gear shaft all the way to the bottom and youll see a small white plastic gear at the very bottom this is what drives the limit assembly underneath that small white gear you will see a clip it has three points you want to spread apart the two outer points and it should slide right off dont worry about losing this clip there should be a new one in your gear kit then you will need to remove that small white gear once in a while they can be sticky and not slide right off so just use a flathead screwdriver to pry it off do not worry about damaging it because also there will be another one in your new gear kit. Now the gear kit should slide right out of the motorhead from the top sometimes its tricky to get the big white gear through that whole but it will come through just be careful not to damage anything when you are pulling it out. If youre motorhead is too close to the ceiling to remove this part you may have to drop the opener down to remove it. Once you have removed the gear and sprocket there is usually always some residue from the old kit like chewed up white plastic dust or black metal dust is best if you try to remove this debris from the opera before you put in the new part by using either a small vacuum compressed air or some kind of small brush being careful not to harm any of the other parts in the opener.
Step four – this step is very important because you will need to remove the bushing that the metal post of the gear and sprocket assembly slides into this bushing can easily get worn out over many years and once it distorts or the boar is made bigger by a malfunctioning gear assembly when you put the new assembly in the open or you may still have some of the same problems so replacing this bushing is very important and heres how you do it. Most of the time they are easily removed with a flathead screwdriver or by tapping it with a hammer underneath the lip of the bushing and trying to remove it. The reason for this is the small white gear at the bottom of the post is what drives the limit assembly and if this bushing is worn out it can affect the connection of the gears and not properly operate the limit assembly. The new bushing will keep this gear in the proper position to operate the limit assembly. Replacing this bushing can be a little difficult but its not too bad. What I usually do is take a 5/16 deep socket and attach a 5 inch extension onto it and stick it through the hole in the top of the motor head right on top of the bushing and then tap the top of the extension with my hammer making sure that the bushing is all the way down and flat to the bracket that holds it. If this bushing is not properly positioned it makes it impossible to reinstall the new gear assembly.
Step five – now you will need to open the new gear kit and take out the gear assembly this part has a steel dome or saucer like top it has three holes in it for the 5/16 screws to screw into and the hole pattern is shaped like a triangle but if you look closely they are have no threads for the screws I find it easy to replace the screws if I thread the holes first before I reinstall the gear kit you can do this by using the 5/16 screws that you removed in the beginning and take your drill or driver and just drive those screws into their holes and then back the screws out this will give the holes threads making it a little easier to get those screws back in where they go. The whole pattern only lines up one way so make sure your holes are lined up in their correct pattern before you start screwing it back together. First you will need to remove that retainer clip and small white plastic gear at the bottom of the post to slide the gear assembly into the opener. Now you will need to get the small package of white gear grease out of your new kit and tear the top off. Proper lubrication of the gears is absolutely a must. First you want to put a small amount of grease on the metal post below the drive gear so when you are sliding it into the bushing it will have some sort of lubrication. You should pretty much used a whole package of grease to lubricate the gears you will want to spread the grease around the teeth of the white drive gear save a little bit of greece to add some when the gear kit is attached. If you do not properly lubricate the gears the opener will not work the gears will heat up and start to stick in the opener will not open or close or will start giving you problems in the process of doing so. There is one thing you must deal with before installing the new gear kit and that is the limit assembly you must first see where your trolley or carriage is on the rail if it is all the way in front then you will need to turn that small gear with your finger and you will see the metal clip move back and forth. There are two metal tabs with wires attached to them one for the upper limit and one for the down limit so if the trolley is all the way in the front of the garage you will need to move that clip to the down limit as close as possible if the trolley is all the way towards the motorhead in the back then you will need to turn that small gear and move that clip towards the up limit connection. Or if the trolley is somewhere in the middle of the rail then you will need to put that clip in the middle of the two contact points you do not have to be exactly precise but you need to be is close enough as possible if you need to know which is the upper limit and which is the down limit then look at the steel cover you removed it will show you which one is for up and which one is for the down limit. You do not want them to be reversed because when you test the opener after you repaired it it totally screws everything up and can cause other problems this small step will save you a lot of aggravation. Now you will need to slide the new gear and sprocket back into place of course you will need to slide it in through the top making sure the bottom of the post probably goes through that bushing that you replaced earlier the dome or metal saucer top should sit flat on top of the motorhead if it is not flat then there is something wrong it is not properly sliding into where it needs to go. Once you have the gear assembly properly in place go ahead and reattach your 5/16 screws. If you are using eight impact or drill to turn the screws be sure not to catch any of the wires when you are tightening the screws just take your finger and make sure they are out of the way when you are tightening down the screws because you can catch a wire and tighten it down and then when you go to plug the opener back in it will short out the motorhead or control board. Once the gear assembly is properly in place you will need to slide that small white plastic gear back onto the post and attach your retainer clip to keep that gear in place. Now you will need to grab the rest of the gear agrees that you have and put a little bit on that bottom white gear that drives the limit assembly and then whatever else you should put a little bit on the worm gear also and just spread it around that gear use the whole thing the more the better.
Step six – now you will need to reattach the chain to the sprocket and tighten the chain down pretty much the opposite of taking the chain off you will need to tighten that left hand not on the carriage you do not want to make the chain too tight so just make sure it is not sagging. I usually do not attach the opener cover until I am sure that the gear and sprocket is working properly so now you will need to test it plug the motorhead back into its socket give it about a minute and then you will want to disconnect the door from the opener by pulling down on the read emergency release cord pulling it down and to the back will keep it unlocked so the trolley can move freely back¬and¬forth on the rail without picking up the door with it. You will most likely need to readjust the limits on the opener before the job is complete this is why or one reason why I do not put the cover back on yet because it is easier to turn the limit screws with your fingers and get proper up and down limit position. Now hit the button on your wall control or your remote making sure that the trolley is probably moving back and forth. Now that you have the proper limit positions go ahead and reattach the motorhead steel cover. Be careful if you are testing the opera without the cover on because if you are anywhere near the motorhead when it engages or starts up it tends to spray all that white grease around and you can get it in your eye or your mouth doesn’t taste very well.