
Introduction to Gear Sprocket Replacement
Replacing the gear sprocket in a LiftMaster chain drive opener is a common repair that many homeowners find necessary. The primary indication that your gear and sprocket assembly needs replacing is when the motor runs but the opener carriage does not move. A loud grinding noise can also be a sign that the gear is wearing out. This guide walks you through diagnosing the problem and offers step-by-step instructions for replacing the gear sprocket, ensuring your opener operates smoothly again.
Diagnosing the Issue
When you activate your LiftMaster garage door opener and hear the motor running without any movement of the door, it indicates a malfunction in the gear and sprocket assembly. Additionally, if the opener makes loud grinding noises or fails to stop correctly while operating the door, these are signs that the limit switches, driven by the gear assembly, may not be functioning properly.
Cost of Replacement Parts
The cost for a replacement gear sprocket kit typically ranges from $25 to $50. Purchasing from a local garage door company may be challenging, as they often do not sell parts to the general public. Online platforms like eBay or Amazon are usually reliable sources for these parts. Alternatively, you can check retailers like Sears, which also stock compatible components for LiftMaster models.
Understanding the Difficulty Level
Replacing the gear sprocket kit is a moderate-level repair that usually takes between one to two hours. Having the right tools and a basic understanding of garage door openers will make the process smoother and less frustrating.
Tools Required for the Repair
Before you begin, gather the following tools to make the repair easier:
- Impact Drill (recommended but not necessary)
- 1/2-inch socket or wrench
- 5/16-inch socket and wrench (5/16-inch ratchet wrench recommended)
- 1/4-inch socket
- Flathead and Phillips-head screwdrivers
- 3-inch socket extension
Common Mistakes When Installing Openers
One of the most frequent errors made during installation is tightening the chain or belt too tightly. This excess tension can place undue stress on the gear and sprocket assembly, leading to premature wear or malfunction. It’s essential to balance your garage door properly and avoid overtightening the chain or belt to ensure optimal performance.
Inspecting for Wear and Tear
The gear and sprocket assembly can fail for a couple of main reasons:
- The plastic gear that turns the sprocket may wear out due to excessive weight from the door, especially if the springs are not balanced correctly.
- A chain or belt that is too tight can strip the teeth from the gear, resulting in functional issues.
Carefully inspect the parts by removing the screws and opening the motor head to determine the source of the failure.
Gathering Required Parts
Before starting the replacement process, ensure that you have the correct parts. It’s crucial to know the horsepower of the opener (1/3, 1/2, or 3/4 HP) as the gear and sprocket kit will vary based on this specification. You can usually find the model number on a sticker located inside the light cover of the opener.
Step-by-Step Instruction: Safety First
Step One: Unplugging the Motorhead
Safety is the top priority. Unplug the motorhead from the electrical socket to avoid electric shocks or shorting the opener’s control board while performing the repair.
Step Two: Removing the Chain or Belt
Next, locate the trolley or carriage on the opener rail. You’ll need to loosen the left-side nut holding the chain or belt to the trolley without completely removing it. This will allow you to detach the chain from the sprocket for easier access to the gear assembly.
Step Three: Accessing the Gear and Sprocket Assembly
Remove the steel cover on the opener motor head. Depending on the model, screws may be Phillips head or 1/4-inch drive sockets. After removing the necessary screws, you can access the gear and sprocket assembly located at the top of the opener.
Step Four: Replacing the Bushing
It’s important to replace the bushing that supports the gear and sprocket assembly. A worn bushing can lead to malfunctioning gears. Use a flathead screwdriver or a hammer to remove the old bushing and replace it with a new one to ensure the correct function of the opener.
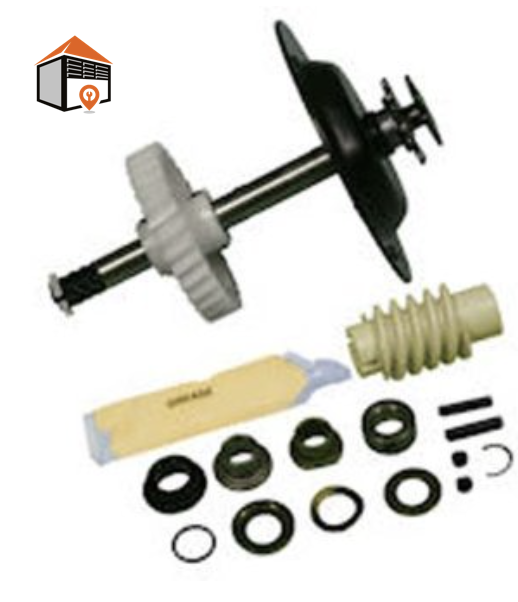
Step Five: Installing the New Gear Kit
Open the new gear kit and prepare to install the new assembly. Lubricate the gears well with the provided grease to ensure they operate smoothly. Ensure that the assembly aligns correctly in the opener before securing it with screws.
Step Six: Reattaching the Chain and Testing
Finally, reattach the chain to the sprocket, ensuring it’s neither too tight nor too loose, and reconnect the motorhead. Before permanently fastening the cover, test the opener to adjust the limits if necessary. Ensure that the limits work perfectly before tightening everything down and sealing