Diagnostic- the number one reason for the deterioration or malfunction of the garage door cable is fraying when a garage door cable starts to deteriorate the small wires that make up the cable will individually start to break apart it is very easy to see when a cable starts to fray and sometimes it may not be so easy if the framing starts early on. You may have some fraying and not be able to see it with the naked eye.
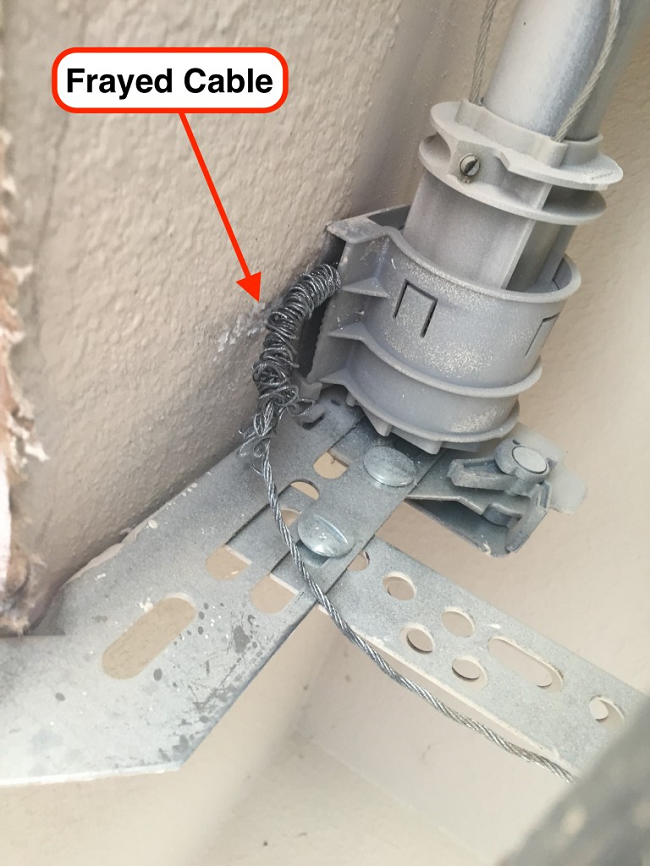
If you cannot see any visible frame of the cable you can grab a heavy duty pair of gloves preferably made of leather and take your thumb and index finger and slowly move them up and down the cable and see if your gloves catch up on any parts of the cable. Another reason for garage door cables to break down in deteriorate is an improper installation this is where the cable is rubbing part of the track or other metal parts of the garage door and overtime wall where the cable out and make it deteriorate.

Cost: $10¬ $20
Difficulty: difficult
Time to repair: 1 ¬2 hours
Tools needed: 3⁄8 ,7/16 ,1⁄2, wrench or socket. Impact drill (not necessary but recommended). Ladder. Winding bars. Vice grips. Carpenters level.
Whether you have a torsion spring lift assist or a extension spring lift assist system on your garage door to replace the cables you are going to have to deal with the springs before we get started you have to decide whether you feel confident enough to deal with high tension springs if you do not feel confident enough do not even attempt to try to call a professional. Torsion and extension springs can cause severe injury and or death so please keep that in mind before you try to attempt this repair. Since the difference between extension and torsion springs is different I will explain how to do both.
Torsion spring cable replacement:
Step one: the first thing you will need to do in order to purchase the correct cable size is measure the height of your garage door from bottom to top the average garage door is 7 feet tall some are little shorter summer much taller. If we use 7 feet tall as a standard for measurement the cable on a 7 foot door is around 101 inches. So if your garage door measures more than seven scenic then however many inches taller than 7 feet your door is you would add those inches to the 101 inches and you should get your approximate cable length. If your measurements for a little bit off you do not want them to be short you’re better off if they are a bit more than what you need but not by much. The garage door cable should at least wrap around
The cable drum by 25% of the the circumference or 1⁄4 of the drum. As far as the thickness of the cable it should be 1⁄8 of an inch thick. If you see that your cable is less than an eighth of an inch you should upgrade to an eighth of an inch thickness on your new cable. Some garage door technicians will just carry a roll of cable and cut it to the link that they need and make their own cables on site. If you have some experience with cables and to cable ferrules then you can do it this way if you like. It would be much easier to build your own cables been hunting down the correct size you will need to replace.
Step two: To star the process of replacing the door cables you must put the garage door in the the down position for all the way closed. The absolute first thing you’ll do is to lock down the torsion springs. Grab your two winding bars and a ladder if needed and slide your first winding bar into the winding hole and slightly lift up on the torsion spring enough to slide the second winding bar underneath the first one so that it can rest up against the top of the garage door. No just take out the first wanting bar you put in so it does not fall out onto you. Now that you have locked down the torsion springs you can remove the bottom hinge or bracket that contains the very bottom roller also it makes it easier to get that bracket off of the door if you remove the next hinge above it so you can slide the bottom bracket up the door because it is easier to remove it the higher up you slide it on the door so removing the next hinge above it allows you to go little bit further to wiggle that bottom bracket off of the track.
Step three: Now that the bottom hinge is off what do you want to do is remove the old cable off of the post by using some pliers maybe or even a screwdriver may help to get the old cable loop off of the post. Once you have removed the old cable you will need to put the new cable moved around to post on the bottom bracket sometimes they can be hard to get on so again a screwdriver may help you achieve this. Once the new cable is on the post you want to put the roller back into the bottom hinge if it has fallen out or you took it out and make sure that the new cable runs over the bottom roller you do not want to get stuck underneath the roller. No you want to put the bottom hinge back on the door so start somewhere near the middle of the garage door putting the roller back into the track then slide the bottom bracket all the way down the door until it is in the position that it was before you removed it you should see the screw holes lined up. Now youll need to reattach however many screws came out of the bottom hinge back to the door.
Step four: now that the bottom hinge is attached to the door and in the right position you will need to run the cable of the door you have to be careful not to run the cable around any of the tractor parts the easiest way to do this to be sure the cable has no obstruction is to run the cable behind each of the rollers starting from the bottom just run the cable behind each roller pulling the cable up until you get to the very top roller and let it hang over the top of the roller if you have to likely make a knot in the cable around the top roller to hold it there just do not pull it tight where it can kink the cable just keep it loose so it does not fall back down to the bottom.
Step five: no you will probably need to grab a ladder if needed and go to the cable drum and loosen the two set screws that hold it on to the torsion pole. No you will probably need to grab a
Ladder if needed and go to the cable drum and loosen the two set screws that hold it on to the torsion pole. You do not have to completely remove the two set screws you just want to loosen them up enough where you can get the cable drum to spin freely around the torsion pole. You are most likely going to need a 7/16 wrench or socket to remove the square headed set screws. If you have a loose and the setscrew and you cannot get the drum to spin freely on the pole and is having a hard time then what happens is if the set screws are tightened down too far they tend to distort the pole and it makes it really hard to get that cable drum to spin freely or even remove. If this is the case for you, you can try some lubricant spray to help that drum break free. Also tapping the drum with a hammer can help with this you just don’t want to tap too hard you can break the cable drum. Now you need to insert the new cable into the cable drum and start to slowly wind the cable around the drum you will notice that there are grooves around the cable drum these are the grooves that the cable should be sitting in as it wraps the cable up. And the top of the door cable will have a feral stop attached to it you want to slide the cable into the slot on the inside of the cable drum it is a lot easier to see this if you just slide the cable drum towards the middle of the door until you can see what’s going on the backside of the drum. The right side cable drum will need to be turned clockwise and the left side cable drum will need to turn counterclockwise turning the cable drum slowly and keeping the cable in the groove into you get the drum taught now before you tighten down the set screws be sure the cable drum is as far right on the torsion pole as it will go it needs to be right up against the bearing bracket. . Once the drum is in place you now need to tighten down the square headed set screws while you are keeping tension on the cable you do not want to lose the tension. Now you will need to repeat the steps on the other side of the garage door because if you are replacing one cable you should always replace them both.
Step six: know that you have both cables installed and both cable drums tighten down it is time to release the tension on the torsion spring. So grab your ladder and grab the second winding bar and slide it into the winding slot just above the one that is holding the spring locked down and very very lightly lift up on the spring just enough to slide out the other winding bar then let down on the spring until you feel the tension on the cables. Now it is time to test the garage door of course do not try to test the garage door with an automatic door opener you must first try it manually by and to make sure that the cable is probably winding on the drums and is not skipping the grooves. Slowly raise the garage door by hand preferably keeping an eye on the cables wrapping around the drums you want to make sure they wrapped it evenly and when the door is all the way up you want to make sure there is very little or no slack in the cable when the door is in the fully up position if there is too much slack the cables can unwind. Slowly open and close the door a few times so that you feel comfortable that everything is working properly before you decide to open it with an automatic door opener.
Extension spring cable replacement:
Replacing the garage door cables on a door that uses extension spring assist to lift the door this can be a whole different ballgame it is more involved and you are dealing with a much much longer cable. Before starting to make this repair I would probably insist that you take pictures of
Everything before you take anything apart just so there is no confusion when you need to run the new cable because it will go through at least two pulleys and over 20 feet of cable. Even a video might help you a bit better because you can show everything instead of using snapshots. You should especially take pictures and make note of where the cables mount to the track most of the time the cable is tied into a not with a metal hook on the end but is crucial to know where it was hooked into the track because this determines the strength of the spring. Youll have to deal with two different cables in most cases doors that are over 15 to 20 years old may only have just one cable the second cable is what they call a safety cable it is tied usually to the tracks back hang and ran through the middle of the spring and attaches to the front of the horizontal track you should not remove or cut this cable this cable is meant to keep the spring in one place if it were to break if he does not have this safety cable the springs are known to fly across the room or cause serious damage and injury. It is also crucial that whatever you do you try to keep the cable on the right side even with the cable on the left side if you have to cut to size because if it is different on one side than the other it is adjustable but is much easier if you just try to keep in the exact same le it is also crucial that whatever you do you try to keep the cable on the right side even with the cable on the left side if you have to cut to size because if it is different on one side than the other it is adjustable but is much easier if you just try to keep in the exact same length. If you are examining your cable system and where they tie off if you noticed there are no books and the cable is just nodded through a hole or notch in the track then it might be a good idea to grab some s hooks from your local hardware store. Also most importantly I am assuming that you are replacing the cables on both sides of the garage door you might as well replace both cables are not that expensive. If you are sure that you are ready to tackle this repair then move on to step one.
Step one: any time that you are dealing with extension springs you half to take the the tension off of the springs by putting the garage door in the full upward position since I dont think you will find anybody to hold that door up while you do the repair work since he could take a couple of hours you will have to lock down the door in the full up position. Most technicians use vice grips to do this. It would be a really good idea if you had two pairs of vice grips to secure the door because you do not want it to be crooked when you are re¬setting the cables. When you have the garage door in the up position then you want to place the vice grips below the bottom roller of the door so the door will not come down when you release the spring you should have a pretty good tight adjustment on the vice grips to ensure they do not just slipped off when the load of the door rest on them. Just be careful not to damage or distort the garage door track in the process. You can use a carpenters level to insure the door is in a level position while you lock down the door in the up position.
Step two: n ow you will have to remove the old cable if it has broken off and not in tact anymore you will not have to worry about this if it is still intact then the fastest way to remove it is to cut the cable if you do not have a safety cable running through the middle of the extension spring then make sure there is absolutely no tension on the spring before you cut it. . If you do not have a pair of cable cutters then you’ll have to remove the cable by hand by undoing the loop that is attached to the bottom hinge of the garage door. If you are building the cable yourself
With cable ferrules and you will want to start by making a small loop big enough to fit around the post attached to the bottom hinge then you want to run the cable along the pulleys using your previous photos or video to ensure you have the right path for the cable. Once you have run the cable through the pulley system and reach the point at the top of the horizontal track where it is tied into then cut the cable where you think it can be easily attached to the top of the horizontal track. Now what you want to do is accurately match the cable for the other side of the door so they are pretty much the same length.
Step three: n ow that you have two identical cables to install . No it is time to run them through the pulley system and hook up the cable to the track to get the right adjustment but you will need to do both sides and have the cables lockdown before you start any adjustments. This is where the s hooks come in handy if you lock down the end of the s hook that contains the cable you want to leave the other and of the hook open so you can. Hook the cable into the proper series of holes on the top of the horizontal track you will just want a tiny bit of tension on the spring when determining what hole to hook the cable into. You will want to hook the cable into the same hole on both sides of the door before you start any adjustments.
Step four: know that you have both cables hooked up it is time to release the garage door from the vice grips and see if you have proper lift assist. Once you release the vice grips the door should start to come down a little bit so now you want to operate the garage door manually by hand making sure that it is level when it is going up and down if it is not level you will feel the door get caught on the track. If a garage door its perfectly balanced then you should be able to put it halfway up or down and should stay in place if it needs more tension on the spring the door will tend to close by its self if the door starting to shoot up after you let go of it then you have too much tension. Before you start to adjust any tension on the springs you should step back and look at your garage door with the naked eye and see if it looks level if it is too close to call with your eye and put a carpenters level of against it to see how close you are. If you need more attention to keep the door up then you want to move the cable hook further towards the front of the garage if you need less tension then of course you would move it back. If the right side of the door is further down than the left then you will need to move the cable hook on the right side further forward and the same distance on the other side. Once you can get the garage door to open and close without any hangups then you have successfully changed your garage door cables. If you have operated the door by hand a few times and all looks good and you have an automatic garage door opener and then you can reengage it to the door and make sure that your opener is now properly opening and closing your garage door.